N1 买了又一段时间了,最开始卖家刷的是 yyf 电视系统,用的不是很满意。
后来自己又重新刷了 wepad 的电视系统,播放和界面各方面都挺满意的,可是投屏的时候总掉线,然后就丢一边吃灰了。目前用天猫盒子投屏,虽然平时有广告也有点卡,但是投屏很稳定,从来没掉过,稳定性压倒一切啊。
刷成 Armbian
很早就想废物利用把这个盒子刷成 Armbian,当个小型 Linux 服务器用用,网上资料比较乱所以一直没行动。这两天把它搞定了。
第一步:降级解锁 bootloader
这一步一般你的盒子如果已经刷过别的系统,就已经做掉了,除非你是全新的 N1 并且还带着原生的系统,否则就不需要了。
怎么降级: https://www.right.com.cn/forum/thread-340279-1-1.html
刷电视盒子的固件一般都是需要双公头的 USB 线的,找不用的 USB 线自己剪一下然后接起来就可以,不一定要去网上买。
第二步:准备启动 U 盘
大致思路:准备一个大于 8G 的 U 盘,准备可以刷镜像进 U 盘的工具,刷镜像,修改 dtb。
- 准备一个 U 盘,不一定需要 USB3.0,因为 N1 是 USB2.0 的接口。
- 刷 U 盘的工具叫 USB Image Tool,需要 Windows 系统。
- 镜像在恩山论坛可以下各种版本的,最稳定的据说是 5.77
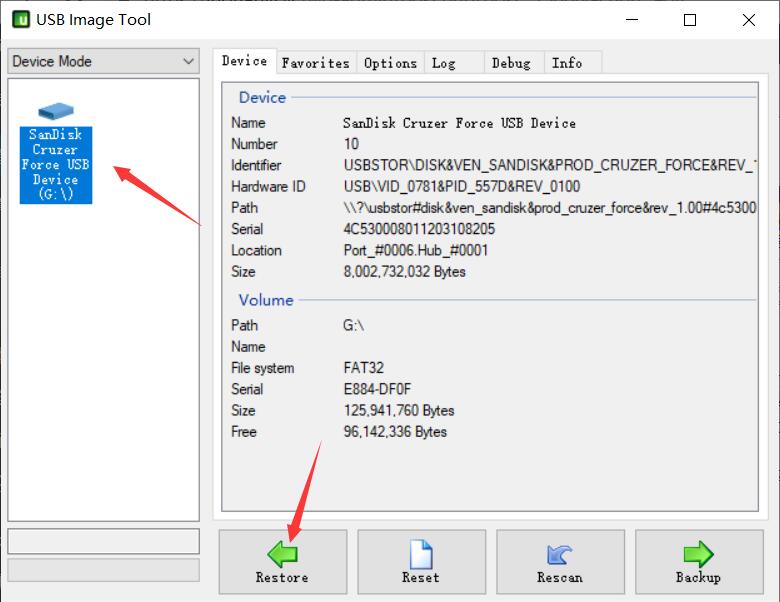
刷机图如上,打开 USB Image Tool,选择你的 U 盘,点击 Restore 后选择镜像,等待结束即可。
USB Image Tool 下载:N1 工具库
其实,刷 U 盘镜像还有很多工具可以用,比如单文件版rufus,或者用 Linux 下的dd命令,MacOSX 应该也有功能类似的软件。如果觉得 U 盘空间太小,还可以用etcher把 Armbian 写到移动硬盘上。
Armbian 镜像网盘下载:https://pan.baidu.com/s/1-7AmPhRkP1LKtqb6X7s9IA 提取码: sjp9
修改 dtb
这一步一般是必要的,但看情况。dtb文件可以理解成驱动文件,Armbian 默认会有一套驱动文件,但不完全适配 N1,导致硬件不正常或者负载过高。所以论坛上就有大神对 N1 的dtb进行了优化,你只需要下载并加载他们的dtb即可。
大致方法如下:
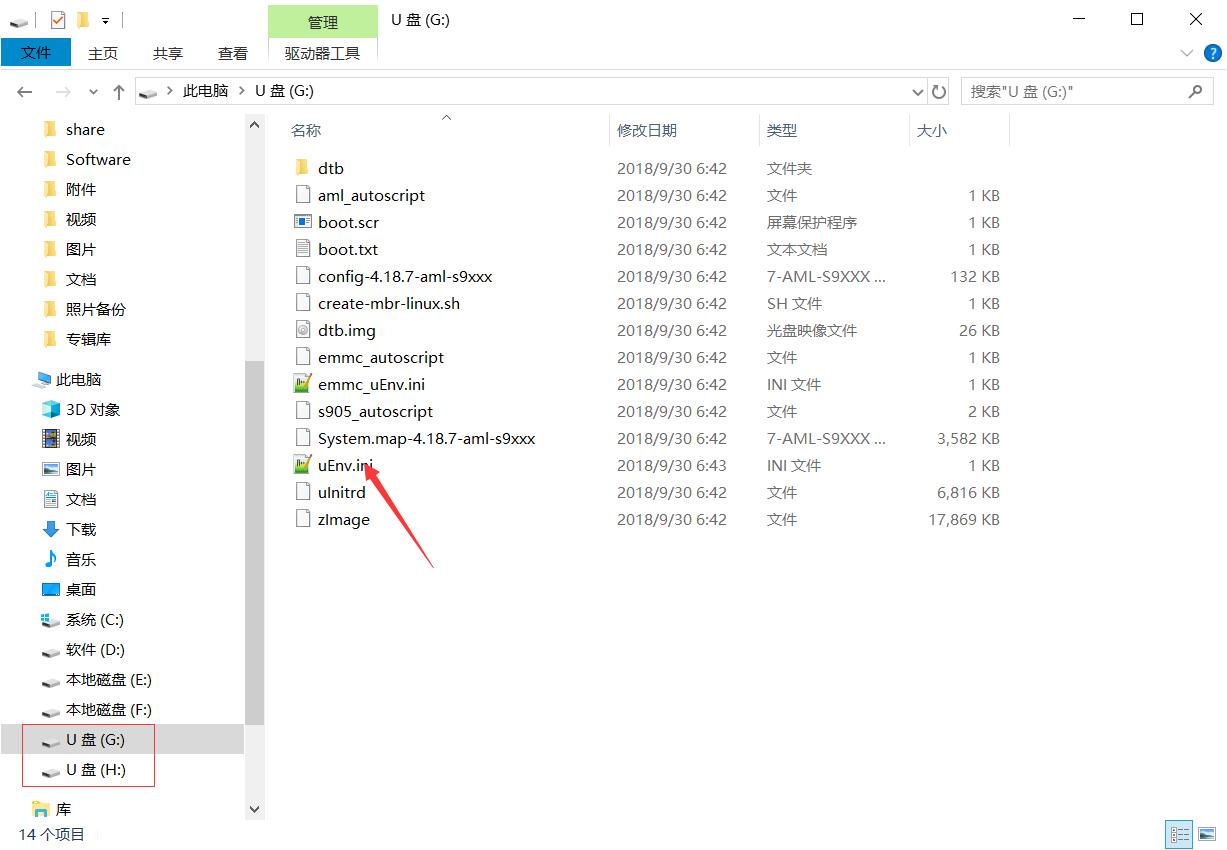
- U 盘烧录镜像完毕后,Boot 分区(U 盘的根目录)允许访问。
- 将下载好的
dtb放入到 U 盘的dtb目录。 - U 盘根目录有一个
nEnv.ini文件,里面写了使用哪个dtb - 修改
nEnv.ini指向刚才拷贝进来的dtb。
Armbian 5.77 的dtb可以用恩山论坛大神提供的,据说稳定性不错:
修改后的eEnv.ini长这样,注意看第一行。
1
2
dtb_name=/dtb/meson-gxl-s905d-phicomm-n1-xiangsm.dtb
bootargs=root=LABEL=ROOTFS rootflags=data=writeback rw console=ttyAML0,115200n8 console=tty0 no_console_suspend consoleblank=0 fsck.fix=yes fsck.repair=yes net.ifnames=0
如果你下载的镜像作者已经说了不需要改dtb和nEnv.ini,那么这一步就不需要做了。驱动不正确的后果就是某些硬件工作不正常,所以还是需要谨慎对待。
另外uEnv.ini文件不能用 Windows 记事本编辑,因为它的换行符在 Linux 下也会识别错误,需要用 Notepad++或者 VsCode 等软件来处理。
到此为止,你的 U 盘准备好了。刷其他系统的思路大致是一样的,搞定 U 盘就搞定了大半。
特别提醒
在没完成从 U 盘启动的工作前,不要在 N1 通电的情况下提前插入 U 盘,Android 系统会修改 U 盘文件的权限,导致 Armbian 后期出现各种诡异的问题。
第三步:从 U 盘启动 N1
确保你的 N1 刷了可以从 U 盘启动的系统,没有的话回到第一步,去刷 wepad 的固件。
之后在局域网内任意一台电脑上通过 adb 去让 N1 从 U 盘启动。
1
2
adb connect <N1的IP,从路由器看>
adb shell reboot update
命令敲完,N1 黑屏后就可以拔掉电源,然后把 U 盘插到靠近 HDMI 的 USB 口,再接上电源就可以进入 Armbian 系统。用root和密码1234登录。
1
2
3
4
5
6
7
8
9
10
11
12
 ____  ___   ___  ____
/ ___|/ _ \ / _ \| ___|
\___ \ (_) | | | |___ \
 ___) \__, | |_| |___) |
|____/  /_/ \___/|____/


Welcome to ARMBIAN 5.77 user-built Debian GNU/Linux 9 (stretch) 5.0.2-aml-s905
System load:   0.01 0.01 0.00  	Up time:       17:03 hours
Memory usage:  11 % of 1838MB 	IP:            169.254.5.171 192.168.1.116
CPU temp:      35°C
Usage of /:    31% of 6.9G   	storage/:      44% of 128M
这时候可以用ls -l命令确认一下 U 盘的目录权限没有被安卓修改,都是root就是对的,如果有错那么你要回去重新刷一下 U 盘了。
1
2
3
4
5
6
7
8
9
10
11
12
13
14
15
16
17
18
19
20
21
22
root@aml:~# ls -l /
total 84
drwxr-xr-x   2 root root  4096 Apr  1  2019 bin
drwxr-xr-x   6 root root 16384 Jan  1  1970 boot
drwxr-xr-x  17 root root  4100 Oct 22 21:46 dev
drwxr-xr-x  87 root root  4096 Oct 23 02:01 etc
drwxr-xr-x   2 root root  4096 Feb  3  2019 home
drwxr-xr-x  17 root root  4096 Apr  1  2019 lib
drwx------   2 root root 16384 Oct 22 20:17 lost+found
drwxr-xr-x   2 root root  4096 Oct 22 20:18 media
drwxr-xr-x   2 root root  4096 Oct 22 20:18 mnt
drwxr-xr-x   2 root root  4096 Apr  1  2019 opt
dr-xr-xr-x 137 root root     0 Jan  1  1970 proc
drwx------   5 root root  4096 Oct 23 10:12 root
drwxr-xr-x  20 root root   700 Oct 23 11:04 run
drwxr-xr-x   2 root root  4096 Apr  1  2019 sbin
drwxrwxr-x   2 root root  4096 Apr  1  2019 selinux
drwxr-xr-x   2 root root  4096 Apr  1  2019 srv
dr-xr-xr-x  12 root root     0 Jan  1  1970 sys
drwxrwxrwt   7 root root   160 Oct 23 12:00 tmp
drwxr-xr-x  10 root root  4096 Apr  1  2019 usr
drwxr-xr-x  12 root root  4096 Apr  1  2019 var
如果 U 盘一直插在盒子上,以后启动就默认进入 Armbian 系统。U 盘拔掉后启动的就是电视系统,想再次进入 Armbian 只需要重复这一步骤即可。
第四步:将 Armbian 刷到盒子里
首先说,这一步不是必要的。在 U 盘运行 Armbian 和在盒子里运行性能是差不多的,除非你:
- 要腾出 U 盘做的别的事情
- 使用盒子上的 USB 口,比如连接额外的硬盘
将系统刷入盒子(emmc:可以理解成 N1 自带的硬盘)很简单,只需要一行命令:
1
nand-sata-install
这行命令敲完之后,再敲一下 halt关机,然后拔掉 U 盘。以后通电就进入 Armbian,就再也不用 U 盘了。
备注
不要使用/root/install.sh,据说有 bug,用这个脚本的话刷 emmc 后第一次可以成功启动,再以后启动就会失败。还是据说,修复的方式就是插上前面的 U 盘去启动 Armbian,用nand-sata-install 重新将系统刷入 emmc(完全覆盖)即可。我没试过,写在这备忘。
U 盘的 Armbian 功能并没有缩减,除非你运行的软件一定要系统跑在 emmc,否则没必要刷到盒子里。
Armbian 的基本配置
第一步肯定是联网了,如果你已经插了网线应该自动连上网了。但如果需要 Wifi 的话,使用umtui命令即可。
1
nmtui
这个命令敲完会出来一个简单的 ui,用键盘方向键就可以选择和配置你的网路。

其实 Armbian 还是很易用的,你登录的时候它就提醒你了可以用armbian-config去配置 Armbian。

敲一下这个命令,你就会发现另外一片天地。
1
armbian-config
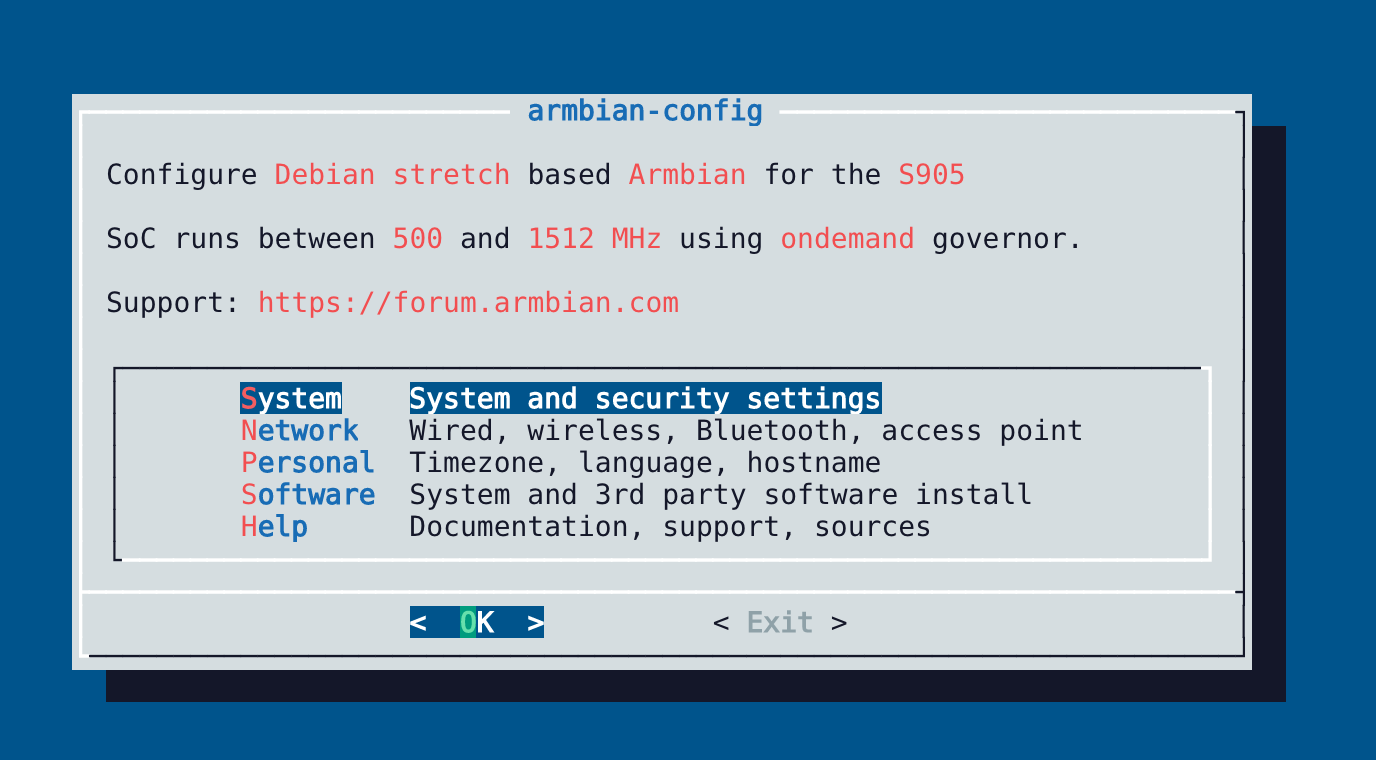
在这里你可以配置很多东西:
- 最基本的网络,Wifi,蓝牙,热点等
- 中文显示
Personal / Locales - 时区
Personal / Timezone - 软件源镜像
Personal / Mirror
这里也不是万能的,有两个小问题需要注意。
一,需要在 ssh 中输入中文的话,还需要修改 /etc/environment 下的 LC_ALL。
1
2
3
root@aml:~# cat /etc/environment
ARCH=arm64
LC_ALL=”en_US.utf-8″
二,需要彻底换软件源的话,还需要修改 /etc/apt/sources/list,替换内容如下:
1
2
3
4
5
6
7
8
9
10
11
12
13
14
15
16
#deb http://httpredir.debian.org/debian stretch main contrib non-free
#deb-src http://httpredir.debian.org/debian stretch main contrib non-free

#deb http://httpredir.debian.org/debian stretch-updates main contrib non-free
#deb-src http://httpredir.debian.org/debian stretch-updates main contrib non-free

#deb http://httpredir.debian.org/debian stretch-backports main contrib non-free
#deb-src http://httpredir.debian.org/debian stretch-backports main contrib non-free

#deb http://security.debian.org/ stretch/updates main contrib non-free
#deb-src http://security.debian.org/ stretch/updates main contrib non-free

deb http://mirrors.ustc.edu.cn/debian stretch main contrib non-free
deb http://mirrors.ustc.edu.cn/debian stretch-updates main contrib non-free
deb http://mirrors.ustc.edu.cn/debian stretch-backports main contrib non-free
deb http://mirrors.ustc.edu.cn/debian-security/ stretch/updates main contrib non-free
修改完之后,执行更新命令更新索引。
1
apt-get update && apt-get upgrade -y
前面从armbian-config里更新的镜像源应该是/etc/apt/sources.list.d/armbian.list里的。
如果需要在 vim 下使用右键粘贴,需要修改一下模式。
1
2
3
4
5
6
7
8
9
10
11
vim /usr/share/vim/vim80/defaults.vim

# 查找 set mouse
if has('mouse')
  set mouse=a
endif

# 将值从"a"改成"r"
if has('mouse')
  set mouse=r
endif
如果需要启用 BBR,可以在/etc/sysctl.conf末尾加上两行:
1
2
net.core.default_qdisc=fq
net.ipv4.tcp_congestion_control=bbr
然后执行:
1
sysctl -p
Armbian 的后续
到此为止,你的 N1 已经是一个可以独立运行的小型 Linux 主机,连上 Wifi 后找个插座就可以 7x24 小时运行了。它的性能如何呢?
ARM64 主流架构,真 64 位 linux 系统,docker 随便玩。
(Armbian 输出:Linux aml 5.0.2-aml-s905 #5.77 SMP PREEMPT Mon Apr 1 17:41:33 MSK 2019 aarch64 GNU/Linux)
真千兆有线网口,2.4/5G 双频 wifi,可以作热点。
自带 8G 的 emmc 存储,Linux 系统可以直接刷到盒子里,不用额外插 SD 卡,I/O 性能好。
CPU 4 核,2G 内存。
其实还是蛮强的,用下面几个命令可以查看它的具体参数:
1
2
3
4
5
6
7
8
9
10
11
12
13
14
15
16
17
18
19
20
21
root@aml:~# cat /proc/cpuinfo
...
root@aml:~# cat /proc/meminfo
...
root@aml:~# free -h
              total        used        free      shared  buff/cache   available
Mem:           1.8G        200M        867M         20M        770M        1.5G
Swap:          919M        4.5M        914M

root@aml:~# df -h
Filesystem      Size  Used Avail Use% Mounted on
udev            469M     0  469M   0% /dev
tmpfs           184M   22M  163M  12% /run
/dev/sda2       6.9G  2.1G  4.8G  31% /
tmpfs           920M     0  920M   0% /dev/shm
tmpfs           5.0M  4.0K  5.0M   1% /run/lock
tmpfs           920M     0  920M   0% /sys/fs/cgroup
tmpfs           920M   16K  920M   1% /tmp
/dev/sda1       128M   56M   73M  44% /boot
/dev/zram0       49M   14M   32M  30% /var/log
tmpfs           184M     0  184M   0% /run/user/0
安装软件
在 Armbian 上安装软件也是非常简单的:
1
apt-get install cockpit
Cockpit 是一个 Linux 服务器的 Web 管理程序,简单易用。
安装 Docker
装个 Docker 也是手到擒来的事情:
1
2
curl -fsSL https://get.docker.com -o get-docker.sh
sh get-docker.sh --mirror Aliyun
注意上面的命令用了阿里云的加速服务。Docker 安装完成后 Docker 镜像的拉取也要加速一下:
1
2
3
4
5
6
7
8
9
mkdir -p /etc/docker
vi /etc/docker/daemon.json

{
"registry-mirrors": ["https://加速镜像地址"]
}

systemctl daemon-reload
systemctl restart docker
我们来安装个 Portainer。
1
2
3
4
docker volume create portainer_data
docker run -d -p 9000:9000 --name portainer \
-v /var/run/docker.sock:/var/run/docker.sock \
-v portainer_data:/data portainer/portainer:linux-arm64
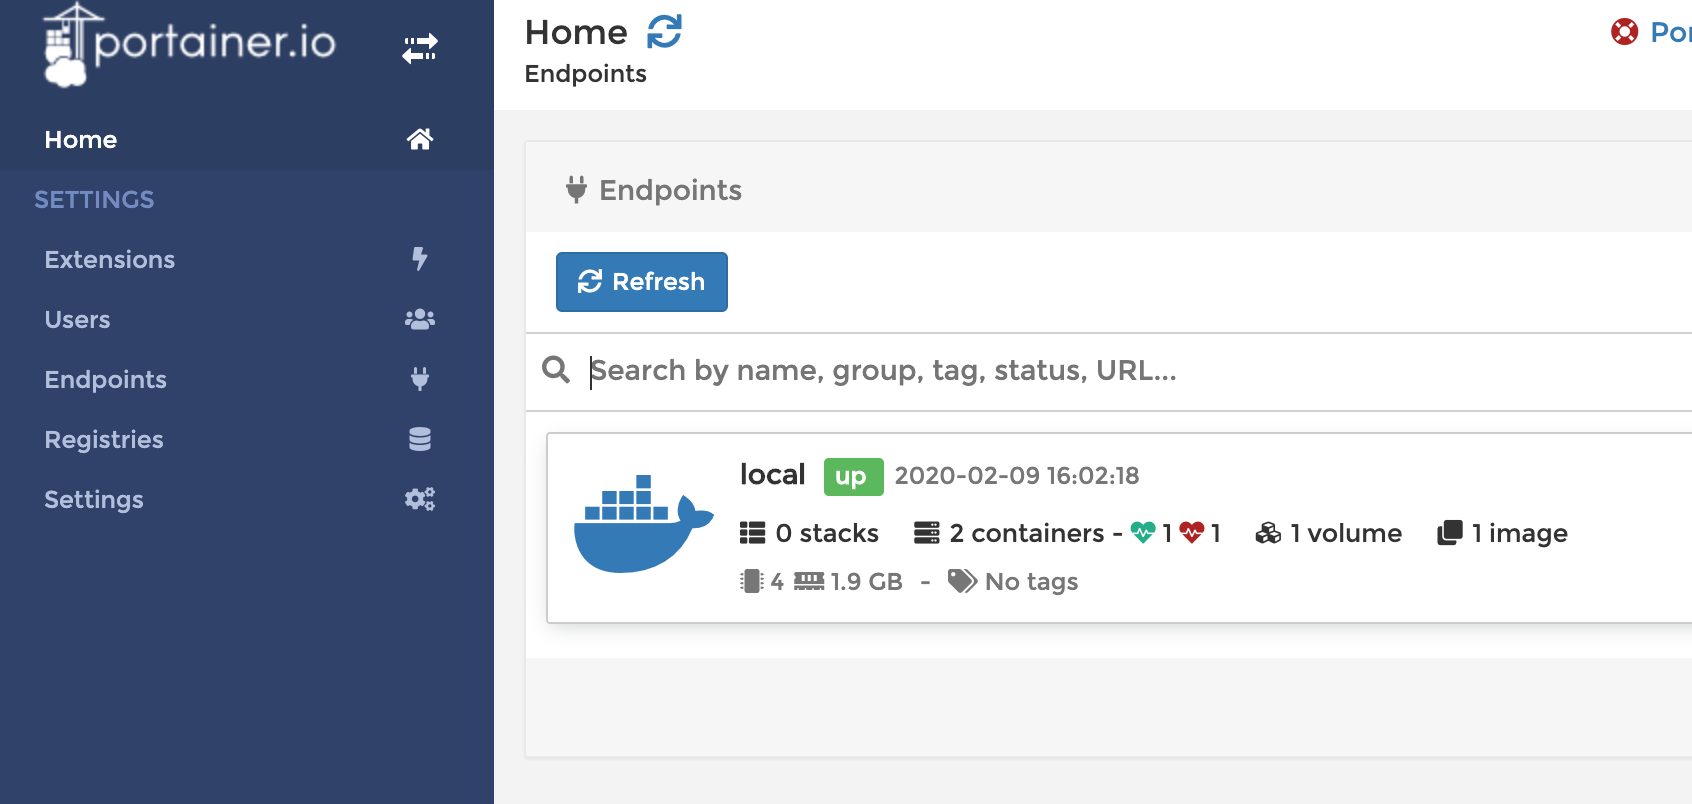
让 Portainer 开机自动运行:
1
docker update --restart=always portainer
注意,Armbian 下的软件都是 Arm 架构的,包括 Docker 镜像,所以在安装前需要甄别一下。
安装 LAMP
LNMP 是 Linux+Nginx+MySQL+PHP 组合缩写,可以认为是 Linux Web 服务器的黄金套件。
- 官网:https://lnmp.org/
1
2
3
4
5
6
7
8
9
10
11
12
13
14
15
16
17
18
19
20
21
22
23
24
25
26
27
28
29
30
31
32
33
34
35
36
37
38
39
40
41
42
43
44
45
46
47
48
49
50
51
52
53
54
55
56
57
root@aml:~/lnmp1.6# wget http://soft.vpser.net/lnmp/lnmp1.6.tar.gz -cO lnmp1.6.tar.gz && tar zxf lnmp1.6.tar.gz && cd lnmp1.6 && ./install.sh lnmp
...
============================== Check install ==============================
Checking ...
Nginx: OK
MySQL: OK
PHP: OK
PHP-FPM: OK
Clean Web Server src directory...
+------------------------------------------------------------------------+
|          LNMP V1.6 for Debian Linux Server, Written by Licess          |
+------------------------------------------------------------------------+
|           For more information please visit https://lnmp.org           |
+------------------------------------------------------------------------+
|    lnmp status manage: lnmp {start|stop|reload|restart|kill|status}    |
+------------------------------------------------------------------------+
|  phpMyAdmin: http://IP/phpmyadmin/                                     |
|  phpinfo: http://IP/phpinfo.php                                        |
|  Prober:  http://IP/p.php                                              |
+------------------------------------------------------------------------+
|  Add VirtualHost: lnmp vhost add                                       |
+------------------------------------------------------------------------+
|  Default directory: /home/wwwroot/default                              |
+------------------------------------------------------------------------+

+-------------------------------------------+
|    Manager for LNMP, Written by Licess    |
+-------------------------------------------+
|              https://lnmp.org             |
+-------------------------------------------+
nginx (pid 1340) is running...
php-fpm is runing!
● mysql.service - LSB: start and stop MySQL
   Loaded: loaded (/etc/init.d/mysql; generated; vendor preset: enabled)
   Active: active (running) since Sun 2020-02-09 22:58:55 CST; 3s ago
     Docs: man:systemd-sysv-generator(8)
      CPU: 16ms
   CGroup: /system.slice/mysql.service
           ├─1380 /bin/sh /usr/local/mysql/bin/mysqld_safe --datadir=/usr/local/mysql/var --pid-file=/usr/local/mysql/var/aml.pid
           └─1880 /usr/local/mysql/bin/mysqld --basedir=/usr/local/mysql --datadir=/usr/local/mysql/var --plugin-dir=/usr/local/mysql/lib/plugin --user=mysql --log-error=aml.err --open-files-limit=65535 --pid-file=/usr/local/mysql/var/aml.pid --socket=/tmp/mysql.sock --port=3306

Feb 09 22:58:36 aml systemd[1]: Starting LSB: start and stop MySQL...
Feb 09 22:58:37 aml mysql[1367]: Starting MySQL
Feb 09 22:58:55 aml mysql[1367]: ...................
Feb 09 22:58:55 aml systemd[1]: Started LSB: start and stop MySQL.
State      Recv-Q Send-Q Local Address:Port               Peer Address:Port
LISTEN     0      50           *:3306                     *:*
LISTEN     0      128          *:80                       *:*
LISTEN     0      128          *:80                       *:*
LISTEN     0      128          *:80                       *:*
LISTEN     0      128          *:80                       *:*
LISTEN     0      128          *:22                       *:*
LISTEN     0      128         :::9090                    :::*
LISTEN     0      128         :::9000                    :::*
LISTEN     0      128         :::22                      :::*
Install lnmp takes 180 minutes.
Install lnmp V1.6 completed! enjoy it.
可能 N1 性能和 LNMP 期望值不一样,安装花了 3 个小时。
内网穿透
如果想从外网访问你的 N1 服务器,就需要使用内网穿透技术了,之前我有写过反向代理和内网穿透,换汤不换药,我们需要 frp。
- 官网:https://github.com/fatedier/frp
大致思路:
- 下载和 frp 服务器对应的客户端版本,使用 arm64 架构
- 准备 frp 的配置文件手动测试成功
- 创建 frp 自启服务,让 frp 长期在后台运行
前面两步需要比较多的调试时间,但操作都比较简单,有机会我再补充。创建自启服务的内容备忘一下:
1
2
3
4
5
6
7
8
9
10
11
12
13
14
15
16
17
18
19
20
vi /lib/systemd/system/frpc.service

[Unit]
Description=Frp Client Service
After=network.target

[Service]
Type=simple
User=nobody
Restart=on-failure
RestartSec=5s
ExecStart=/usr/local/frp_0.27.0/frpc -c /usr/local/frp_0.27.0/frpc.ini
ExecReload=/usr/local/frp_0.27.0/frpc reload -c /usr/local/frp_0.27.0/frpc.ini

[Install]
WantedBy=multi-user.target

systemctl start frpc # 启动客户端
systemctl status frpc # 检查状态
systemctl enable frpc # 开机自启
更多玩法
- Armbian 下 Docker 安装 OpenWrt 做旁路由
- Armbian 下 Docker 做 Web 服务器
- Armbian 下的全局科学上网
- Armbian 下的宝塔面板配置
- https://instar.me/archives/398960e0.html
参考文章
- https://luotianyi.vc/1306.html
- https://luotianyi.vc/1389.html
- N1 完美刷 Armbian 教程
- Armbian 5.77 刷机指南